Showing posts with label keyring. Show all posts

Thursday, February 16, 2023

Crochet Butterfly

 I found this pattern HERE and copied it to my blog because so often, links I love disappear.

Free Crochet Butterfly Pattern

Here is what you will need:

  • worsted weight yarn, scraps will work great
  • US H8/5 mm crochet hook, or another comfortable sized hook
  • tapestry needle, scissors.

Resources and tutorials you may find helpful in following this pattern: Crochet AbbreviationsUS to UK Crochet Conversion Chart.  Find links to stitches on the “Tutorial” menu: Getting Started will show basic stitches used in many patterns and Crochet Stitch Dictionary shows our growing collection of crochet stitch tutorials.
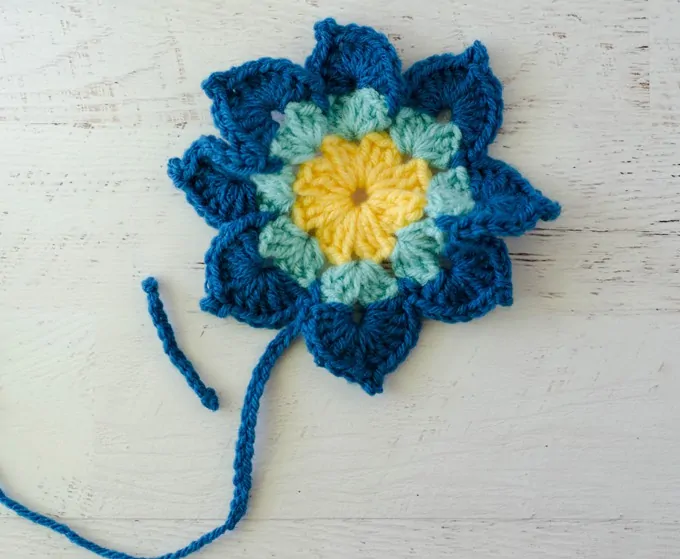

Yellow and blue crochet butterfly before assembly

Butterfly:

With color 1, chain 6 and join to form a ring.


Row 1:  Work the following in the loop:  Ch 3 (counts as 1st dc), 2dc, ch 2, *3 dc, ch 2*, repeat * to * 6 more times (8 clusters).  Join with sl st to top of starting ch 3. Fasten off color 1.


Row 2:  Attach color 2 in any space. [ Ch 3, 2dc, ch 2, 3 dc] in same space as joining, *in next space work [3dc, ch 2, 3 dc]*, repeat * to * 6 more times.  Join with sl st to top of starting ch 3.  Fasten off color 2.


Row 3:  Attach color 3 in any ch-2 space.  In same space as joining, work [ch3, 5 dc, ch 3, sl st to 1st ch (picot formed), 6 dc], sl st in next space, *in next ch-2 space, work [6dc, ch 3, sl st to 1st ch (picot formed), 6 dc], sl st in next space*, repeat * to * 6 more times. Join with sl st to top of starting ch 3.  Do NOT finish off.


Carefully fold butterfly in half.  Chain 15 or enough chain stitches to wrap around the fold for a firm fit.  Do sew down just yet.  Fasten off, leaving a long strand for sewing.


Antennae

Chain 14.  Fasten off and tie a knot on each end of chain.  Pull yarn tight and cut close to the knot.
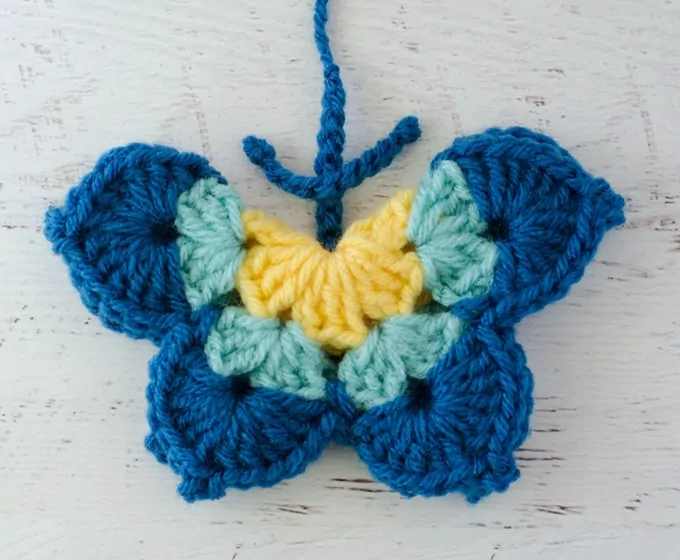
yellow and blue crochet butterfly showing antennae construction

Assembly:

Wrap body chain up and around the body, catching the antennae under the chain at the top.  Sew down firmly.

Saturday, October 12, 2019

Crochet Heart Key Rings


Click here for link to blog post

Click here for link to pattern

I'm reposting the instructions here in case the blog where I found it disappears at some point, which has happened to me before. But full credit goes to José Crochet - Blog

Materials needed:
  • 100% mercerized cotton, suited for hook 3-4 mm
  • a crochet hook at least one size smaller than advised on the label of your skein (I used a 2mm hook)
  • tapestry needle
  • stuffing
  • accessories to decorate like: keyring, ribbon, buttons, beads, bells, felt etc.

Stitches:
ch  - chain                                           
SS – slip stitch                                   
SC – single crochet                        
HDC – half double crochet               
DC – double crochet                        
TC – treble crochet           

Note: I like to crochet quite tight for this project. You don't want gaps or the stuffing to show on the outside.

Start with chain 8.


Turn, and SC in second chain from hook and in the next 6 chains.

* Chain 1, turn, 1 SC in each sc * ;  repeat between * …... * 5 more times.
(You have now a total of 7 rows of 7 SC and completed a small square)
Note: In the original pattern of Karin, it  says to do 8 rows of 7 SC.

Turn, crochet 7 TC in the center (4th stitch) along the side. SS in the opposite corner. You've made the first arch.

Tilt your work and crochet another 7 TC in the center along the next side.
SS in the chain 1 (8th chain) of the starting chain. You've made the second arch.

Chain 3 (this will count as your first DC), work 6 DC evenly along the side.

In the corner (where your tail is): do 1 DC – 1 TC – 1 DC.

Tilt your work again and make 7 DC evenly along the side.

Work 2 DC in each of the next 6 TC. In the 7th you do 1 HDC and 1 SC.
 .

In the first TC of the next of 7-TC-set you do 1 SC and 1 HDC.
Work 2 DC in each of the next 6 TC.

Cut the yarn, leaving an approx. 3 inch tail and pull the yarn through.

Put your crochethook in the first DC made in this last round (passed the chain3), grab the tail from the back and pull it through to the front.


Put your hook upwards in the front loop of the last DC made, grab the tail and pull it through downwards.


Put your hook from the backside to the front of the same last DC. Grab the tail and pull it through to the back of your work.


You sew the tail in along the back of the last DC's made. 


Don't do this too tight. You've just created a sort of mock-stitch that you will need when you crochet the 2 parts together. It replaces the top of the chain 3.


You can notice that this way it's hardly visible where your work ended. 

Crochet another heart.

Knock yourself out decorating the both parts.

Now you've come to the point were you can crochet the both parts together.
Put the wrong sides together and start at the bottom point.

Attach the yarn and do a chain 1. Work a SC in the same bottom stitch.
Work 1 SC in every next stitch.

When you've crocheted the last sc on the right arch, you could do a chain 30 and continue to crochet scs in the left arch. This way you have made your own loop on which you can attach the keyring.

When you have approx. 6-7 stitches left, you can stuff your heart, but don't put too much in it.
Do the remaining SC's and work 2 SC in the same stitch were you've started.

Note: I use the tails to attach a bead or bell before sewing in. 

Attach a ribbon and keyring (or crochet your own ribbon).

Have fun crocheting your own heart ! 
 ♥