Showing posts with label Christmas. Show all posts

Wednesday, December 14, 2011

The Christmas Dress

My sewing machine has been working over time lately!
And for a 20-something year old basic little Janome, it's been doing a brilliant job.
I do love my sewing machine!!

After I finished the 9...nine...Christmas aprons, I had small piece of the gorgeous birdie fabric left to make a Christmas dress or skirt for my Miss 4. I needed to match it with some other fabrics but I knew that wouldn't be difficult because there are so many beautiful Christmas fabrics around at the moment. So I went to Lincraft and chose red spot, and red owl & hearts fabrics.


And Miss 4 helped me pick this pattern...
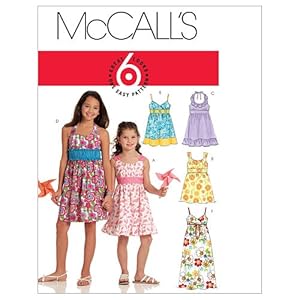
McCall's 5838
 I hadn't made a Christmas dress for her before...I know...slack mum!!
But I was excited about making this one.
It turned out I didn't have quite enough birdie fabric for the frill, so I added an extra red spot frill.
So, after cutting out 12 pattern pieces (I wouldn't call this an easy pattern) and spending all day sewing (I wouldn't call it quick either) I was very, very happy with the end result.


And so was Miss 4, who "really, really, really" loves it!


And today I think my trusty sewing machine (and I) need a rest!

Sunday, December 11, 2011

Christmas Apron Giveaway

I have a glut of Christmas aprons!
I couldn't help myself, I couldn't stop until I'd used every part of every piece of fabric!!
I have just enough birdie print fabric to make my Miss 4 a Christmas skirt or dress.

But here I am with 9...NINE...Christmas aprons.
There are 6 ladies aprons and 3 girls/small ladies aprons.


Red and White Christmas Apron
 
Birdie Christmas Apron with Ruffle

Red Polka Dot Christmas Apron

Birdie Christmas Apron
Polka Dot Christmas Apron with Birdie Trim

Red Polka Dots and Spots Christmas Apron

Red and Green Christmas Apron with Pockets - Size Small


Red and White Christmas Apron with Birdie Ruffle - Size Small

Red and White Christmas Apron with Red Ruffle - Size Small
 
They are all on my Sew Thea shop on Made It.
But I'm fairly certain I won't sell them all (if any) before Christmas.

Sew (see what I did there?)....I'd love to give one away to a lovely reader.
Just tell me which one is your favourite.
Give me a shout out on Facebook or Twitter, if you like.
Follow me here, if you can.
And you're in the running to win a Christmas apron valued at $20!

This is going to be the quickest giveaway in the history of giveaways, so I can get the parcel posted to the winner before Christmas.

12 hours is all you've got!!
It opens 8am this morning (Mon 12th), and I'll pick a winner at 8pm tonight (my time = Qld time)!

I hope you enter, tell your friends, and GOOD LUCK!

Thursday, December 1, 2011

Teacher's Christmas Present

I'm pretty happy with my 7 year old boy's Year One teacher's Christmas present.
I hope she is, too!

Yes, there is a bottle of wine in there.
I made a bag from red lame fabric.
Tied it with a big gold wired edge ribbon bow.
And attached 4 coasters that I made.
I used Christmas fabric and backed them with same red lame fabric.
I sewed a few beads to each corner.

And there you have it...a cheap and easy Christmas present.
But it looks pretty fancy, don't you think?


I have some similar coasters in my shop Sew Thea.
Click on the link or the button on my side bar to check them out.

Saturday, November 26, 2011

Christmas Apron

Christmas is almost upon us again.
I've never enjoyed being in the kitchen.
But this is so darn cute...it almost makes me want to cook!!


I used a modified version of this pattern...

Butterick B4945


This apron is for sale on my shop Sew Thea at Made It.
Click on the button to go shopping! 


Friday, December 10, 2010

Christmas Bags

Don't wrap your Christmas presents, bag them!
I love doing this...I've done it on and off for the past 10 years depending on how much time I have leading up to Christmas. This Christmas I'm feeling particularly organized and on top of everything so I've made some more.

They're so easy. Just buy some pretty Christmas fabric and ribbons. Sew simple sacks in various sizes to fit whatever you are giving. They're especially good for hard to wrap pressies.

Sometimes I sew the ribbon into the back seam. This year I'm just adding the ribbon around the top separately. If the sack isn't quite big enough to scrunch around the top, fold in inside like a pillow-slip and wrap ribbon all the way around the gift.

Here are some, I still have more to do...


They're so easy.
Just fill, tie with ribbon and add a gift tag.
And another advantage is they're reusable!

Wednesday, December 1, 2010

Felt Christmas Decorations

I love making Christmas decorations.
I decided to make these for my son's teachers this year.
I loved getting decorations with the child's name and year when I was teaching.
I still hang them on my tree and remember them fondly.

 
front
 

back
 I also made these without the words for our mums' Christmas presents.

My boy's favourite colour at the moment is orange and he wanted these for his tree.


So grab yourself some felt, beads, stuffing and cord and go for it.
You can stuff them or leave them flat, either way...

they're fun, cute and cheap!

Wednesday, December 23, 2009

Santa Sacks

I realize it's probably too late to make these for this Christmas (although I just made mine yesterday), but after Christmas, pick yourself up some cheaper Christmas fabric and make them for next year...


You will need -

  • Polypop fabric to suit your desired size of sack (I made mine 80cm x 110cm so I bought 1.6m per sack)
  • paper templates of the letters of the name for the sack (mine were 15cm x 10cm, I could fit 5 letters across an 80cm sack, cut them to a smaller size for longer names)
  • 0.2m Christmas fabric (you'll get 8 letters of 10cm x 15cm from that amount, buy more if necessary)
  • 0.2m double sided fusible webbing
  • 1m double sided satin ribbon
  • glitter fabric paint/glue
  • matching thread

To make up -

  1. Iron rough side of webbing to wrong side of Christmas fabric.
  2. Place and pin letter templates, then cut out.
  3. Sew cut edges of polypop together and finish seam.
  4. Fold so seam is at centre back and sew bottom edge of sack, finish seam.
  5. Sew a 10cm hem at top of the sack.
  6. Attach centre of ribbon to the back seam 20cm from the top of the sack.
  7. Pull paper backing off the cut out letters.
  8. Place them and iron them onto sack one at a time.
  9. Trace around the edges with the glitter paint/glue.
  10. Fill with pressies and goodies, tie it up and place it at the end of your child's/children's bed/s.


Wish I had one!  Merry Christmas!!
     

Thursday, December 3, 2009

Beaded snowflakes

 I absolutely love these!!


What you need -

beading wire
round nose pliers
thin ribbon
2mm bicone crystals (or small bead)
4mm bicone crystals
6mm bicone crystals
head pins
eye pins

What to do -

  1. On 6 eye pins feed 2 4mm bicones, 2 6mm bicones & 4 4mm bicones.  Allow 1cm to curl end with round nose pliers.
  2. Cut 20cm of beading wire and secure around one of the beaded eye pins at the end of the wire.  Then secure remaining 5 pins one at a time with the beading wire while fanning each arm to form the snowflake shape.
  3. Once you have secured the last arm, feed onto the remaining wire a 4mm, 6mm and 4mm bicone to form a centre piece and to cover the wiring securing the arms.  Secure the wire by winding and twisting the remainder.
  4. To make the arm dangles, feed a 2mm then a 6mm bicone on 5 head pins.  Cut excess and curl to make a loop while attaching one to each end of each arm.
  5. For the last arm, feed a 2mm then a 6mm bicone on one eye pin, curl and make a loop while attaching.  On the other loop of the eye pin, feed and tie a ribbon to hang snowflake.

These are so pretty I leave one hanging on my daughter's wall all year round.

Fabric Covered Christmas Decorations

These are really pretty, and they have a vintage feel to them.  I made them 20 years ago...time to make some more I think!


What you need -

foam balls
Christmas fabrics
butter knife
fine cord
sequins
pins

What to do -

  • Indent 2 lines all the way around each ball to make quarters with the blunt knife.

  • Cut fabric in this shape just big enough to cover each quarter of the ball.
  • With the edge of the knife, push the fabric into the indentations you made until the edges disappear (cut away any excess).
  • Do this for each quarter using a combination of fabrics.
  • Wrap the cord around the ball (as you would around a present, twisting at the bottom).
  • Secure the bottom twisted cord with a pin through a sequin.
  • Make a loop at the top and cut the ends, use another sequin and pin to secure them at the top.
  • Make heaps and hang them everywhere!

Felt Photo Christmas Decorations

What you need -

felt squares
paper templates
craft glue
scissors
knitting cotton or fine metallic cord
large eye needle
photos

What to do -

Pin paper template shapes (I used hearts, stars, bells and balls) to 2 layers of felt.
Cut out pairs of shapes.
Find something round to trace around (a large glue stick is a good size) on one of the shapes of each pair.
Carefully cut the circle out.
Cut the photos to slightly larger than the holes.
Glue behind so the felt shape becomes the frame.
Place the pair back together and using the cotton or thread, running stitch around the edges leaving enough length to tie ends together.
Hang on Christmas tree, on door knobs, anywhere...


Painted Christmas Tree Balls


What you need -

Foam balls
Metallic paint
Glitter paint
Ribbon of your choice
Star sequins
Pins

What to do -

  1. Paint foam balls on one side, allow to dry.  Paint the other side.
  2. Paint in the same way with glitter paint.
  3. When the balls are completely dry, wrap the ribbon around the ball, twist like you're wrapping a present and bring ribbon up to the top, make a loop and secure with a pin through a star sequin.  Also secure the twisted ribbon at the bottom with a pin through a star sequin.
  4. Randomly place a few more stars with pins on the ball and one in the middle of each ribbon section.
  5. And, you're done!
  6. Hang on the Christmas tree, or anywhere that takes your fancy.