Showing posts with label knitting. Show all posts

Monday, March 30, 2020

Heart Cable Pattern


Pattern works over 16 stitches

Row 1: P2, K2, C4B, C4F, K2, P2
Even rows: knit Ks & purl Ps
Row 3: P2, CR4B, K4, CL4F, P2
Row 5: P1, CR3B, P2, C4B, P2, CL3F, P1
Row 7: CR3B, P3, K4, P3, CL3F
Row 9: K2, P4, C4B, P4, K2
Row 11: CL4F, C4B, C4F, CR4B

Repeat rows 3 - 12 to continue pattern

C4B = slip 2 hold to back, knit 2, knit 2 from cable needle
C4F = slip 2 hold to front, knit 2, knit 2 from cable needle
CR4B = slip 2 hold to back, knit 2, purl 2 from cable needle
CL4F = slip 2 hold to front, purl 2, knit 2 from cable needle
CR3B = slip 1 hold to back, knit 2, purl 1 from cable needle
CL3F = slip 2 hold to front, purt 1, knit 2 from cable needle

Thursday, June 19, 2014

Stocking Stitich Beanie (8 ply)


Materials
1 ball 100g or 2 balls 50g 8ply wool
Pair 4.5mm needles

Tension
Stocking stitch – 21 sts and 28 rows to 10cm using 4.5mm needles

Using 4.5mm needles cast on 106 sts.
1st row: K2, *P2, K2, repeat from * to end
2nd row: P2, *K2, P2, repeat from * to end
Repeat first 2 rows 4 times …….. 10 rows rib in all
                                                
Work 26 rows stocking stitch beginning with a knit row

Shape crown
1st row:  K1,*K11, K2 tog, repeat from * to last st, K1 (98 sts)
2nd and alternate rows: Purl to end
3rd row:  K1,*K10, K2 tog, repeat from * to last st, K1 (90 sts)
5th row:  K1,*K9, K2 tog, repeat from * to last st, K1    (82 sts)
7th row:  K1,*K8, K2 tog, repeat from * to last st, K1    (74 sts)
9th row:  K1, *K7, K2 tog, repeat from * to last st, K1    (66 sts)
11th row: K1,*K6, K2 tog, repeat from * to last st, K1    (58 sts)  
13th row: K1,*K5, K2 tog, repeat from * to last st, K1    (50 sts)
15th row: K1,*K4, K2 tog, repeat from * to last st, K1    (42 sts)
17th row: K1,*K3, K2 tog, repeat from * to last st, K1    (34 sts)
19th row: K1,*K2, K2 tog, repeat from * to last st, K1    (26 sts)
21st row:  (K2 tog) 13 times
Break off yarn, run end through remaining sts, pull tight and secure.

Make Up
Using mattress stitch, join seam

ABBREVIATIONS
K – Knit                       
P – Purl                       
St - stitch
Tog – together

Stocking stitch – one row knit, one row purl

Thursday, February 6, 2014

iPod/Phone Jumper


C8f - slip the next four stitches onto the cable needle, and hold it in the front of your work. Knit the next four stitches on the left needle. Knit the four stitches from the cable needle (C8f made).

Using 8 ply yarn and 4.5mm knitting needles, cast on 24 stitches.

Row 1 - K6, P2, K8, P2, K6
Row 2 - P6, K2, P8, K2, P6
Row 3 - K6, P2, C8f, P2, K6
Row 4 - repeat row 2
Rows 5 to 10 - repeat rows 1 & 2, repeated 3 times
Row 11 - repeat row 3
Rows 12 to 18 - repeat rows 4 to 10 once
Row 19 - repeat row 3
Row 20 - repeat row 2
Row 21 - repeat row 1
Row 22 - repeat row 2
Row 23 - K1, (P2, K2) repeat until last 3 stitches, P2, K1
Row 24 - P1, (K2, P2) repeat until last 3 stitches, K2, P1
Row 25 - repeat row 23
Row 26 - repeat row 24

Cast off in rib

Sew back seam with a yarn needle.
Making sure the seam is centred at the back, sew the bottom seam with a yarn needle.

Make loop by attaching a long piece of yarn with a crochet hook at the top of the centre back.
With the two strands of yarn together ch10 then join a centre back with a slip stitch.
Weave ends into work with a yarn needle.

Attach a button to the front with a yarn needle.
And you're done!

Friday, March 22, 2013

Mug Cosy


c6f  = slip next 3 stitches onto a cable needle, hold at front of work, knit 3 stitches, knit 3 stitches from cable needle

Using 8 ply wool and 4 mm knitting needles cast on 47 stitches.

Row 1: k1, p1, k2, *p6, k2, p1, k2, repeat from * 2 times, p6, k2, p1, k1
Row 2: p1, k1, p2, *k6, p2, k1, p2 repeat from * 2 times, k6, p2, k1, p1
Row 3: repeat row 1
Row 4: repeat row 2
Row 5: repeat row 1
Row 6: p1, k1, p2, *c6f, p2, k1, p2 repeat from * 2 times, c6f, p2, k1, p1
Repeat Rows 1 - 6, 2 times
Rows 19 - 23: repeat rows 1 - 5

Cast off loosely following pattern

Leave a long length of yarn before cutting off

Using a yarn needle stitch the top corners together.
Weave yarn down 1/3 of the cozy, using a 4 mm crochet hook, hook through the edge and ch10, join back to work another 1/3 down and weave end into the cozy.
Using the yarn needle stitch the bottom corners together.
Sew a button in the centre of the opposite edge to the crocheted loop.


Wednesday, February 6, 2013

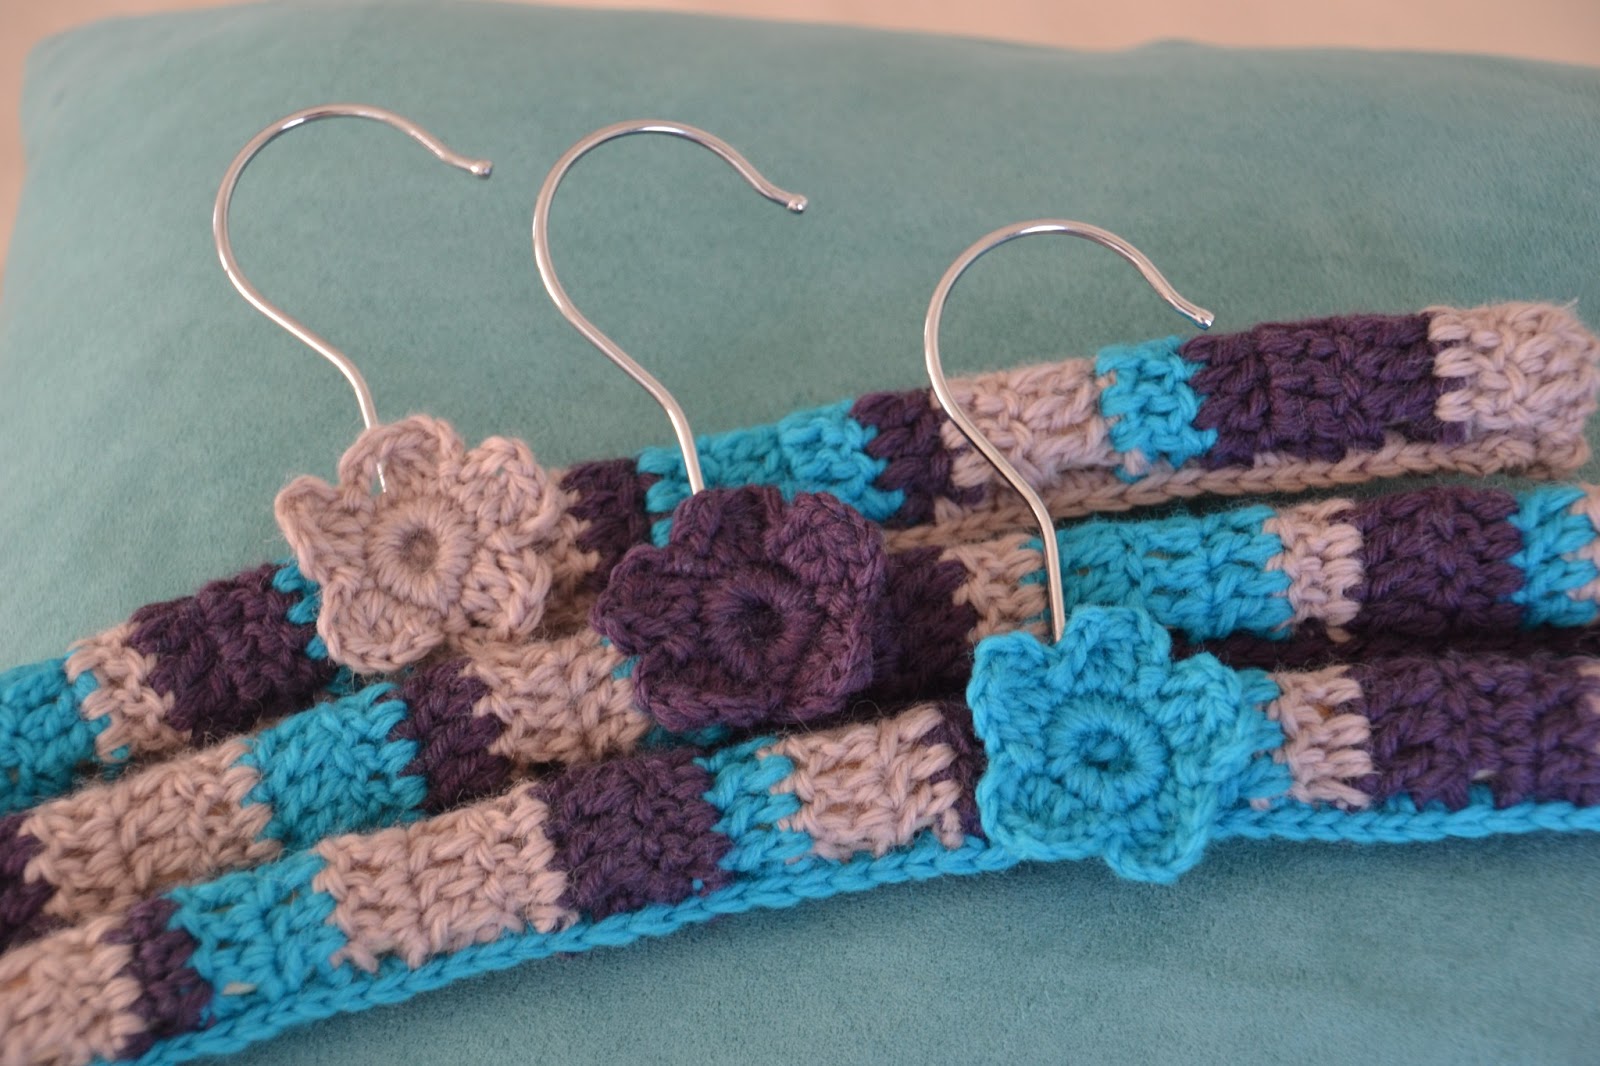
Covered Coat Hangers


I've been very busy lately making these for our school fete next month.
Which ones do you like best?
I've still got 8 to make...then I'm doing hanging hand towels.

I'm thinking I might make some of these for my Made It store...


Linking up today with

Trish @


for Wordless Wednesday

Tuesday, January 15, 2013

Knitted Cushion Covers

I have just sold these.
It was a lot of knitting (thank God for my air-conditioned bedroom!)
But I am so proud of them.
They've become one of my favourite things made by me.


Wednesday, June 20, 2012

Girls Scarves

After convincing my little Miss 4 to model for me again, I added some new girls scarves to my Made It store, Sew Thea, today. I love scarves, she loves scarves, it's sad it doesn't get cold enough here to wear them very often.

Here are the girls scarves in my store at the moment...


To visit my store at Made It, click on the button.

Wednesday, March 28, 2012

Neck Warmers - Cuffs & Cowls

I've been trying something new.
Neck warmers!
I have made two so far and I'm planning on making lots more because I love them.
They're a great variation on the scarf. They are easy to wear and don't have bits that get in the way.

This one is a cowl.  I knitted a ribbed rectangle about 70cm long by 25cm wide.
Then twisted it and sewed the short ends together.


And this one is another rectangle 73cm long by 11cm wide using the bobble yarn from Lincraft.
I made a button hole at the end and added a large button to the other end.


There are more to come but both of these are available on my Made It store Sew Thea at the moment.

Click on the button to check them out.

Friday, August 12, 2011

Baggy Beanie Beret

I found a great pattern here that I used to make this...

I love it!


This one is on my Made It shop Sew Thea but I'm making one for me for next winter.

Tuesday, May 31, 2011

The Poncho!

Last year my good bloggy friend, Lucy, suggested I make ponchos for my shop.
I thought it was an excellent idea.
So I began one...last year.
And finished it...today!

Man, was there a lot of knitting involved.
It is simply one rectangle, with one end stitched to one side.
You can wear it any way you like. Just pop it on and twist it until you're happy.
I've never owned a knitted poncho before.
And the thing is, I love it so much I'm keeping it for me.

What do you think?
Cool or what??


The shorter one is a knitted rectangle, 45cm x 110cm


Wednesday, June 16, 2010

Knitted Scarves

I'm going through a scarf phase at the moment.
I am loving the different types of gorgeous yarns around so I buy balls and wonder what to do with them.
So far, I keep turning them into scarves!
Shame it's not really cold enough here to wear them.

So, grab a fancy ball of wool/yarn.
Garb a set of large knitting needles, size 5mm - 7mm.
And knit away until the ball is finished!

Here are some I've done so far...


Sunday, June 13, 2010

Girl's Feathers Hat


I made this for my 2 year old little girl.
Here is the pattern for 3 sizes - toddler, girl, teenager/adult

Using Feathers style yarn
5 1/2mm knitting needles
Cast on 60 (64, 70) stitches
Row 1 - 4 Knit 2, purl 2 to end
Change to 6mm knitting needles
Knit stocking stitch until work measures 16 (17, 18)cm from beginning ending with a purl row
Knit 2 together across the whole row
Purl
Knit 2 together across the whole row
Purl
Cut yarn at 30cm from end of work
Thread a wool needle onto yarn and pass the needle through all stitches left on the knitting needle
Remove knitting needle, pull stitches tight, sew seam down the back of the beanie.

I crocheted a flower that I found here to sew on the side.

Tuesday, June 1, 2010

Bobbly Scarf


I picked up a couple of balls of Ping Pong yarn from Big W yesterday to make a scarf.  I'd never knitted with it before so it took a little while to get used to the bobbly bits.

I wasn't expecting it, but I started and finished it yesterday!

You need -

2 balls Ping Pong yarn
6mm knitting needles
To make -

Cast on 6 stitches
Knit until you finish both balls
Cast off
Finish off ends

Can't get any easier than that!!

This blue one is knitted on 5 stitches which makes it slightly thinner and longer.

Sunday, May 23, 2010

Knitted Teddy Bear


I love this toy!
I love knitting and I love soft toys and this one is so easy.
It's knitted in one piece, then stitched up and stuffed...can't get much easier than that!


Materials -


2 x 50g balls of any fluffy yarn
1 x 100g ball of matching or contrasting 8ply yarn
6mm needles
2 black buttons for eyes (optional)
black yarn
stuffing


Legs:
With 6mm needles and one strand each of plain and fluffy yarns held together, cast on 8 stitches.
Stocking stitch for 16 rows, ending on a purl row.  Break yarn and transfer live stitches to a stitch holder.
Repeat for second leg, again ending on a purl row.  Do NOT break yarn.
Knit across the leg just worked, and the leg from the stitch holder (16 stitches).


Belly & Arms:
Stocking stitch 12 rows.
Cast on 10 stitches at the beginning of the next two rows using backward loop cast on.  These form the arms, a total of 36 stitches.
Stocking stitch 6 rows.
Cast off 10 stitches at the beginning of each of the next 2 rows to finish the arms (16 stitches remaining).


Head:
Stocking stitch 32 rows (creating front and back of head).


Arms & Back:
Cast on 10 stitches at the beginning of the next two rows using backward loop cast on.  These form the arms, a total of 36 stitches.
Stocking stitch 6 rows.
Cast off 10 stitches at the beginning of each of the next 2 rows, to finish the arms (16 stitches remaining).
Stocking stitch 12 rows.


Legs:
Work first 8 stitches on needle and slip remaining 8 stitches to a stitch holder.
Work 16 rows for leg and cast off.
Place stitches from stitch holder back onto needle, rejoin yarn and work 16 rows for leg.  Cast off.


Making Up:


Weave in all ends.  Fold bear in half along the head section ensuring legs and arms line up neatly.  Pin in place if desired.  Starting at an inside leg roughly an inch from the end of the leg, begin seaming the bear, following round the outside to the top of the head.  Secure yarn, and seam other side, again starting near the bottom of the leg and continuing to the top of the head, with an opening now left where the legs join the body.


Create ears by running stitches across the corner at each side of the head.


Stuff bear, filling head and arms first, and then legs and stomach.


Make neck by weaving a length of yarn in and out around the bear where the arms join.  Pull tight, pushing more stuffing up into the head to firm before securing the yarn and tidying the ends.  Finish stuffing the bear, and seam the opening shut.


Sew  buttons on for eyes and embroider a nose and mouth.  If giving to a child, embroider eyes rather than using buttons.


I love giving these as gifts for new born babies.

Wednesday, May 12, 2010

Bed Socks


I've just finished this cute little pink pair of bed socks (toddler size) for my 2 year old daughter.  I made some (young child size) for my 5 year old son last year.

Here's the pattern...

Accessories - 1 pair each 4mm and 3.25mm knitting needles
Materials - 1 x 100g ball 8 ply yarn
Sizes - toddler, young child, older child, ladies, mens
Approx finished length - 16cm, 21cm, 

Using 3.25 mm needles cast on 41 (55, 61, 67, 71)
1st Row - K2 *P1 K1 rep from * to last st, K1
2nd Row - K1 *P1 K1 rep from * to end
Work 19 (25, 29, 31, 33) rows rib

Change to 4mm needles
Work 16 (20, 22, 24, 26) rows stocking stitch beginning with knit row.
Divide for instep - K28 (37, 41, 45, 48) turn.
Next row - P15 (19, 21, 23, 25) turn.
Work 9 (13, 15, 17, 19) rows stocking stitch on these 15 (19, 21, 23, 25) stitches.
Row 10 (14, 16, 18, 20) - P1, P2 tog, P9 (13, 15, 17, 19), S1 P1 psso, P1
Row 11 (15, 17, 19, 21) - Knit
Row 12 (16, 18, 20, 22) - P1, P2 tog, P7 (11, 13, 15, 17), S1 P1 psso, P1
11 (15, 17, 19, 21) stitches
Break off yarn.
With right side facing, join in yarn and knit up 12 (15, 17, 19, 21) instep sts, knit up evenly along side of instep, knit across 11 (15, 17, 19, 21) instep sts, knit up 12 (15, 17, 19, 21) evenly along other side of instep, knit to end... 61 (81, 91, 101, 109) sts.
Knit 11 (15, 17, 19, 21) rows garter stitch.

Shape foot
1st Row - K1 (K2 tog, K25 (35, 40, 45, 49) K2 tog, K1) twice.
2nd Row - Knit
3rd Row - K1 (K2 tog, K23 (33, 38, 43, 47) K2 tog, K1) twice.
4th Row - Knit
5th Row - K1 (K2 tog, K21 (31, 36, 41, 45) K2 tog, K1) twice.
6th Row - Knit
7th Row - K1 (K2 tog, K19 ( 29, 34, 39, 43) K2 tog, K1) twice... 45 (65, 75, 85, 93) sts.
8th Row - Knit.  Cast off.

Make up - Use flat seam to join leg and foot seams.


Now, I'm off to make a pair for myself! :)