Thursday, January 21, 2010

Library Bag

Well, my eldest child is starting school next week and when I saw on the book list that he needed a library bag, I knew that was one thing I could make...easy!


You will need -

60cm of your child's favourite fabric
90cm cord
thread to match


To make -

  • Cut 2 pieces 45cm x 55cm.
  • Sew with right sides facing each other, both sides and bottom with 1cm seams.
  • Overlock or finish edges.
  • Fold over 5cm to the inside and press with iron.
  • Make 2 button holes big enough to pass the cord through on either side of one of the side seams just under the folded line in the bag (not the casing allowance).
  • Fold top down 2cm and fold again on the ironed fold line, sew to make a casing for the cord.
  • Thread one end of the cord through one buttonhole, around the top and out of the other button hole.
  • Tie end together and finish off with sticky-tape if the cord frays easily.
  • Turn the finished bag out the right way and press the seams flat.
    There you go, instant library bag...just add books!

    Wednesday, December 23, 2009

    Santa Sacks

    I realize it's probably too late to make these for this Christmas (although I just made mine yesterday), but after Christmas, pick yourself up some cheaper Christmas fabric and make them for next year...


    You will need -

    • Polypop fabric to suit your desired size of sack (I made mine 80cm x 110cm so I bought 1.6m per sack)
    • paper templates of the letters of the name for the sack (mine were 15cm x 10cm, I could fit 5 letters across an 80cm sack, cut them to a smaller size for longer names)
    • 0.2m Christmas fabric (you'll get 8 letters of 10cm x 15cm from that amount, buy more if necessary)
    • 0.2m double sided fusible webbing
    • 1m double sided satin ribbon
    • glitter fabric paint/glue
    • matching thread

    To make up -

    1. Iron rough side of webbing to wrong side of Christmas fabric.
    2. Place and pin letter templates, then cut out.
    3. Sew cut edges of polypop together and finish seam.
    4. Fold so seam is at centre back and sew bottom edge of sack, finish seam.
    5. Sew a 10cm hem at top of the sack.
    6. Attach centre of ribbon to the back seam 20cm from the top of the sack.
    7. Pull paper backing off the cut out letters.
    8. Place them and iron them onto sack one at a time.
    9. Trace around the edges with the glitter paint/glue.
    10. Fill with pressies and goodies, tie it up and place it at the end of your child's/children's bed/s.


    Wish I had one!  Merry Christmas!!
       

    Thursday, December 3, 2009

    Beaded snowflakes

     I absolutely love these!!


    What you need -

    beading wire
    round nose pliers
    thin ribbon
    2mm bicone crystals (or small bead)
    4mm bicone crystals
    6mm bicone crystals
    head pins
    eye pins

    What to do -

    1. On 6 eye pins feed 2 4mm bicones, 2 6mm bicones & 4 4mm bicones.  Allow 1cm to curl end with round nose pliers.
    2. Cut 20cm of beading wire and secure around one of the beaded eye pins at the end of the wire.  Then secure remaining 5 pins one at a time with the beading wire while fanning each arm to form the snowflake shape.
    3. Once you have secured the last arm, feed onto the remaining wire a 4mm, 6mm and 4mm bicone to form a centre piece and to cover the wiring securing the arms.  Secure the wire by winding and twisting the remainder.
    4. To make the arm dangles, feed a 2mm then a 6mm bicone on 5 head pins.  Cut excess and curl to make a loop while attaching one to each end of each arm.
    5. For the last arm, feed a 2mm then a 6mm bicone on one eye pin, curl and make a loop while attaching.  On the other loop of the eye pin, feed and tie a ribbon to hang snowflake.

    These are so pretty I leave one hanging on my daughter's wall all year round.

    Fabric Covered Christmas Decorations

    These are really pretty, and they have a vintage feel to them.  I made them 20 years ago...time to make some more I think!


    What you need -

    foam balls
    Christmas fabrics
    butter knife
    fine cord
    sequins
    pins

    What to do -

    • Indent 2 lines all the way around each ball to make quarters with the blunt knife.

    • Cut fabric in this shape just big enough to cover each quarter of the ball.
    • With the edge of the knife, push the fabric into the indentations you made until the edges disappear (cut away any excess).
    • Do this for each quarter using a combination of fabrics.
    • Wrap the cord around the ball (as you would around a present, twisting at the bottom).
    • Secure the bottom twisted cord with a pin through a sequin.
    • Make a loop at the top and cut the ends, use another sequin and pin to secure them at the top.
    • Make heaps and hang them everywhere!

    Felt Photo Christmas Decorations

    What you need -

    felt squares
    paper templates
    craft glue
    scissors
    knitting cotton or fine metallic cord
    large eye needle
    photos

    What to do -

    Pin paper template shapes (I used hearts, stars, bells and balls) to 2 layers of felt.
    Cut out pairs of shapes.
    Find something round to trace around (a large glue stick is a good size) on one of the shapes of each pair.
    Carefully cut the circle out.
    Cut the photos to slightly larger than the holes.
    Glue behind so the felt shape becomes the frame.
    Place the pair back together and using the cotton or thread, running stitch around the edges leaving enough length to tie ends together.
    Hang on Christmas tree, on door knobs, anywhere...


    Painted Christmas Tree Balls


    What you need -

    Foam balls
    Metallic paint
    Glitter paint
    Ribbon of your choice
    Star sequins
    Pins

    What to do -

    1. Paint foam balls on one side, allow to dry.  Paint the other side.
    2. Paint in the same way with glitter paint.
    3. When the balls are completely dry, wrap the ribbon around the ball, twist like you're wrapping a present and bring ribbon up to the top, make a loop and secure with a pin through a star sequin.  Also secure the twisted ribbon at the bottom with a pin through a star sequin.
    4. Randomly place a few more stars with pins on the ball and one in the middle of each ribbon section.
    5. And, you're done!
    6. Hang on the Christmas tree, or anywhere that takes your fancy.

    Wednesday, November 4, 2009

    Baby Mobile


    I made this for my baby girl's room just after she was born.
    It's easy and looks so gorgeous in her room.

    To make it you will need -
    1 wooden circle frame
    1 small ring (plastic or metal)
    3m cord
    4 felt squares of different colours
    shape patterns 5-6cms (I used stars, hearts & flowers)
    craft paint
    craft glue
    wadding
    knitting cotton
    string
    large eye needle
    (I found all of these things at Spotlight)

    • Paint the wooden frame with a couple of coats of craft paint.
    • Cut the cord into 3 x 1m lengths (use sticky tape to stop ends fraying).
    • Cut 2 of each shape from each felt colour.
    • Glue the dot shapes to the centre of both sides for the flower shapes.
    • Chose the six shapes you wish to use as the bottom level.
    • Using the knitting cotton and needle, sew close to the edges using running stitch.  When a small opening remains fill with a little wadding, put the end of the cord inside the shape, then stitch the gap making sure you catch the cord with one of the stitches.  End off with a knot on the inside.  Repeat five times for the bottom level shapes.
    • Sew the remaining 6 shapes in the same way on into the cord with a 10 - 15cm space from shape on the end making sure to stitch top and bottom to the cord.  Slightly different space lengths give it a more random look.
    • Attach the 3 cords to the ring by folding them in half, placing the loop through the ring and pulling both ends through.
    • Once the paint is completely dry on the frame, wind each cord length around the frame twice, leaving about 15 - 20cm from the ring to the frame.
    • Attach a length of string to the ring so it can hang from the ceiling.

    This is fun to make for your own baby.  Or make it as a gift for a baby shower or newborn.  There's something extra special about handmade gifts!


    Sunday, September 6, 2009

    Sleeping Bags/Sleeping Sacks/Snuggle Sacks/Snuggies

    When my boy was too big for the sleeping bags with sleeves (which I LOVE) yet still too little to pull up his blankets when he woke up cold, I decided to make him a sleeping bag.  Little did I know it would become one of his favourite things. He is almost five and practically lives in it (day & night) in the cooler months.

    Today I made one for his little sister who is almost two and I thought I would share the idea because it is so quick and easy and cosy and comfy and practical...perfect!


    Start with a polar fleece blanket, single bed size.
    Bring the short sides together and sew in the longest zip you can find leaving a small opening at the top.  Sew a seam the rest of the way down to the bottom.
    Sew across the bottom and the top, leaving a hole with plenty of head room.
    I cut armholes and blanket stitched the edges for my boy's so he could sleep in it at night and put his arms out to undo the zip in the morning.  But he never uses the armholes, he puts his arms out from the top, so I didn't bother putting holes in my little girl's.  I still may at a later date if she needs or wants them.
    I finished them off with iron-on motifs.

    After all the rough play my boy gave his sleeping bag, when it started coming apart at the top and bottom I used crochet cotton to blanket stitch over the machine stitching.  Now it should last awhile longer, until he grows out of it at least.  Then I'm thinking I may open the bottom and sew some extra length in a contrasting colour, if he can't bear to part with it!

    PS And here's another I made for my niece's birthday present.  As she will be 8 I sewed the long ends together and inserted a zip to give extra length.  It's a little narrower but it is still snug and cosy!!  I want to make one for myself now!

    PPS And another one for another niece.  This one is all hand sewn.


    Thursday, March 6, 2008

    Denise's veil

    A white tulle short veil trimmed with very narrow satin ribbon.


    Saturday, February 23, 2008

    G's Deb Dress

    Satin deb dress with lace up back.  The full skirt has a sparkle organza overlay

    Thursday, May 20, 2004

    L's Deb Dress

    Halter neck deb dress with beaded detail around neckline.

    Tuesday, May 11, 2004

    Lisa's groom's and groomsmen's ties and handkerchiefs


    This was the first time I'd made ties (and handkerchiefs).  They turned out really well!

    Lisa's veil

    Lisa's veil is cream tulle, short and trimmed in narrow satin ribbon.

    Wednesday, May 5, 2004

    Lisa's Wedding Dress


    Lisa's Bridesmaids

    Four dresses, same style, different colours.  Satin dresses with chiffon overlay. They have asymmetrical hemlines, the chiffon a little shorter to show some of the satin.  They also have matching chiffon scarves.

    Saturday, May 1, 2004

    Lisa's ring cushion

    Lisa's ring cushion was made from the same fabric as her dress and trimmed with the same piping and beads.


    Friday, December 12, 2003

    Anne's Mother of the Bride Outfit

    Royal blue chiffon over satin skirt and top.  The v-neck top has a diamonte trim.  The chiffon hemline of the skirt is slightly longer than the satin.

    Kelly's Flowergirls

    Three aqua dresses with diamontes sewn in a star shape on the bodice.

    Friday, October 10, 2003

    Pink Formal Dress

    Pale pink school formal dress with darker pink lining.  Asymmetrical skirt hem to reveal lining at the back.  Backless, crossover and tied straps with beading on one side of the bodice.

    Friday, May 30, 2003

    R's Deb Dress

    Front row 5th from right


    Satin one shoulder dress with single strap at the back.  Dress has asymmetrical seam joining bodice to skirt.  Skirt has chiffon overlay.

    Friday, September 13, 2002

    My Flowergirl

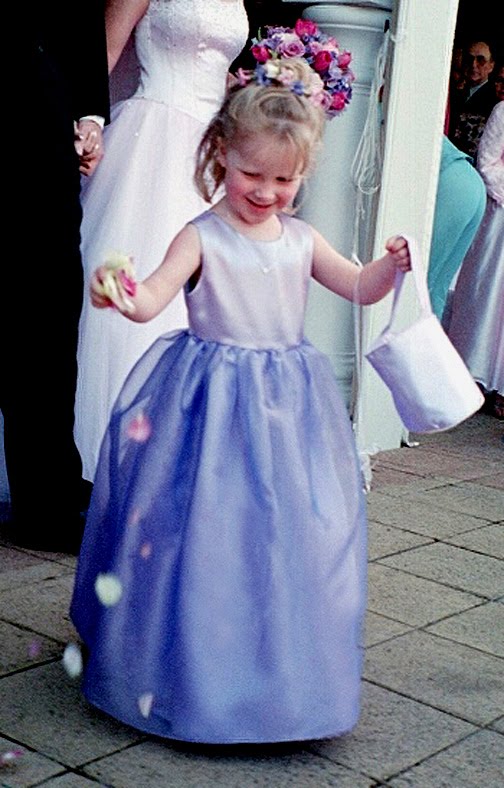
    A mauve satin and organza dress with a sewn in tulle petticoat, and a satin bag for rose petals.

    Saturday, May 5, 2001

    E's Deb Dress

    Satin deb dress with corded embroidery (that didn't show up in my photos) on the bodice and pearl beading.

    Saturday, September 16, 2000

    Karen's Bridesmaids


    These three bridesmaids' outfits were skirts and tops in steel blue satin.  The tops were sleeveless with boat necklines.  The skirts were straight, ankle length with a split at the back.  The dresses also had matching bags with beaded trim.